
Connect to the site
Learn how to upload content
After you have created some content (eg. a webpage) you might want to upload it to the site.
Do this first: create a new site
Before you can upload anything, you must first create a site. So, first register for a new portfolio site.
Then return here to make a connection and upload your first HTML file.
Basic steps
These are the basic steps you should take. Each step is described in detail below.
- Install an FTP client.
- Setup the connection
- Upload files.
Before you continue, make sure you did register for a new portfolio site. Otherwise you will not be able to complete this tutorial.
1. Install an FTP client
To transfer files from your computer to a website (this is often called 'publishing'), you need an FTP client like FileZilla. Install this app on your computer. An alternative for FileZilla is WinSCP.
Make sure you have the latest version
If you have installed FileZilla more than 2 months ago, check if you have the latest version via Help > Check for Updates.
You must be connected to the UT-network
If you are connecting from home, please use a VPN connection.
If you are at the UT, make sure you connect to the EDUROAM Wifi network (or use a fixed connection).
2. Setup the connection
Start FileZilla and choose File > Site Manager from the menu. Click the button New Site to add a new site. On the left, you can change it's name to anything you like. Then, fill in the connection details as indicated below.
| 1) Host: | portfolio.cr.utwente.nl (or portfolio.id.utwente.nl if you are an Industrial Design student) |
| 2) Protocol: | SFTP |
| 3) Logon Type: | Normal |
| 4) User & password: | Username (student number, eg. s1234567) and password of your student-account Do NOT use the database-password here! Make sure the first letter of the username is a lowercase 's'. |

Press Connect to save the connection settings and make the connection.
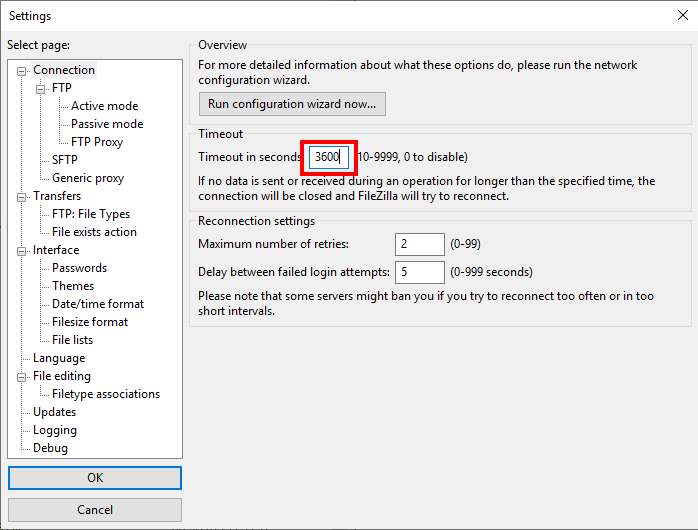
Recommended: set timeout to a higher value:
Change the default timeout setting of FileZilla from 20 sec. to 1 hour (3600 sec.). Choose Edit > Preferences. Change the 20 into 3600 and press Ok:
Reconnect
You can connect quickly from the Site Manager dropdown:
Click the small triangle next to the first icon in the toolbar, then select the site (named "New site" in the example above).
Do not use the quick-connect bar at the top of the main screen of FileZilla!
3. Upload files
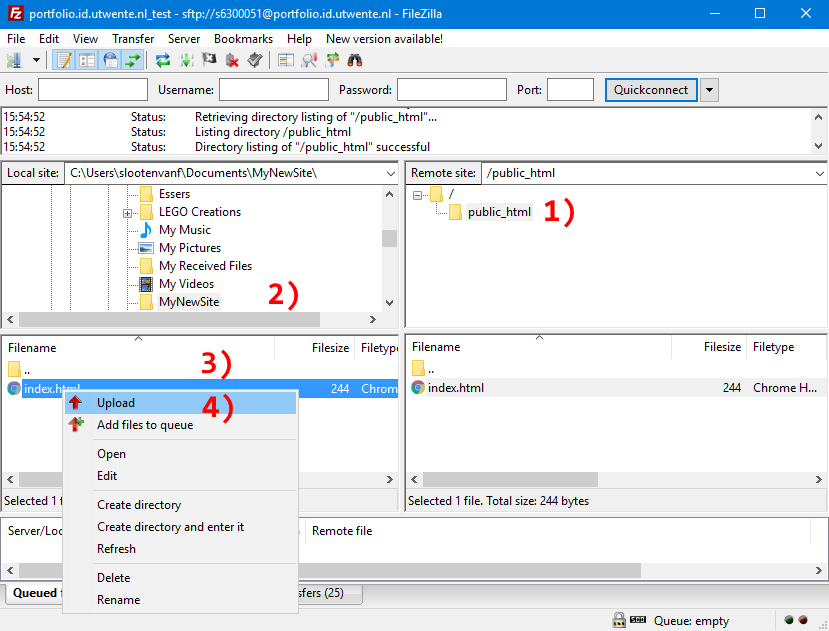
To upload your files:
- On the remote site (right side), browse to the folder which contains your site:
public_html - On the local site (left side), browse to the folder on your computer which contains your webpage(s)
- On the local site (left side), select all files (shortcut: CTRL+A)
- Upload: right-click on selection, choose Upload or simply drag the selection to the right side
If you need more help, you can watch a video on how to upload files with FileZilla. If you are using MacOS, watch this version.
Upload all files (including images, stylesheets) to the Remote site. Make sure the homepage of your site (named index.html or index.php) is in the public_html folder (and not in a subfolder). Check this at the right
side of the FileZilla window (Remote site). If you encounter problems, check out the first 3 questions in the FAQ.
Important: your first page (homepage) should have the name index.html or index.php
For your site-address to work, your site should have an index-file: your first page (homepage) should have the name index.html or index.php. Filenames are case-sensitive. Use only lowercase characters for index-files.
FileZilla tip: save folder locations
If you use FileZilla a lot, you might become tired of always having to browse to the folders (step 1 & 2). You can set default folders in the settings: choose File > Site Manager from the menu and go to the tab "Advanced". There you
can set the 'Default local directory' and 'Default remote directory' so these settings are retained.
Need help?
Check the FAQ page. If you keep getting problems, use the chat to ask a question or contact us for help via email.